I’m spending more and more time over on the forums at Permies.com and think I probably won’t be back at this ‘blog very often. I’m still very active on Skye with loads going on, but I’m putting my projects on Permies rather than here. I never got on with the new editor format for WordPress, and enjoy the craic at Permies!
These are links to some of my project threads:
The Tree field: general progress in the tree field with a summary of what I’ve done to date.
Natural Farming: My efforts at a building a low input simple farming system
Chinampa: a new project on a water terrace/chinampa area
Perennial polycultures: growing food from alternative perennial food plants in polycultures
Do have a browse around there, and say ‘hello’ if you’ve come over from this ‘blog!
I’d just like to mention how great I found the recent master gardener program, and I really recommend it to anyone who is interested in improving and understanding the life in their soil, gardening without chemicals, improving the nutrition in the food they grow with minimal external inputs. This is a little taster video:
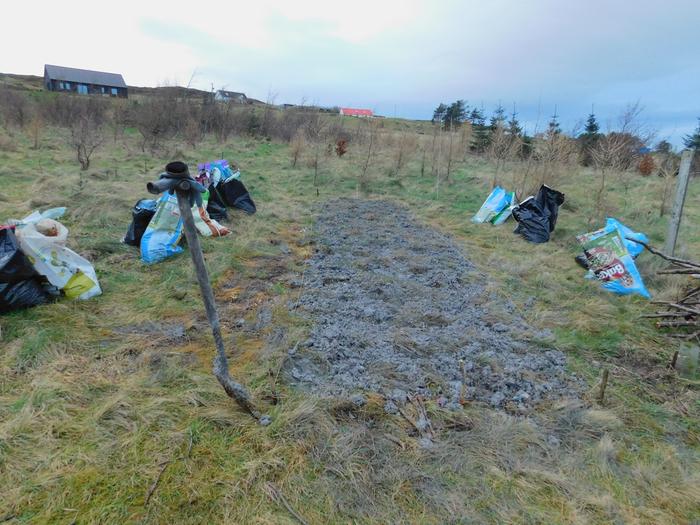
Above one of our normal pedestrian access paths on my ‘north plot’ there is a section where I can make a growing plot about 4ft x 20ft. I’m preparing this section as a ‘lazy bed’, or my version of those. This area will be a ‘nursery area’. I have been collecting a variety of seeds to start my landraces, but obviously limited numbers of each. I’m hoping to increase my seeds by letting as much go to seed as possible, but with my borderline growing conditions, I’m thinking the plants can use as much help as I can give them, hence I’m making some soil improvements.
I temporarily marked out the area with string and spread out woodash over the whole area. I then loosened the compacted soil a bit by digging the fork in and lifting, but not breaking the turf. Hopefully the woodash will help the pH a bit, although since it has been sitting outside a while much of the KOH may have leached out already. Even if it doesn’t help the pH much, there is a bit of charcoal, which may act as biochar in time. Much of it is also ash from paper and cardboard which my husband likes to burn in our other stove (not the range cooker). This leaves a residue of clay (from the coated paper) which I think will help my lighter soil too.
Woodash Spreading Lazy Bed
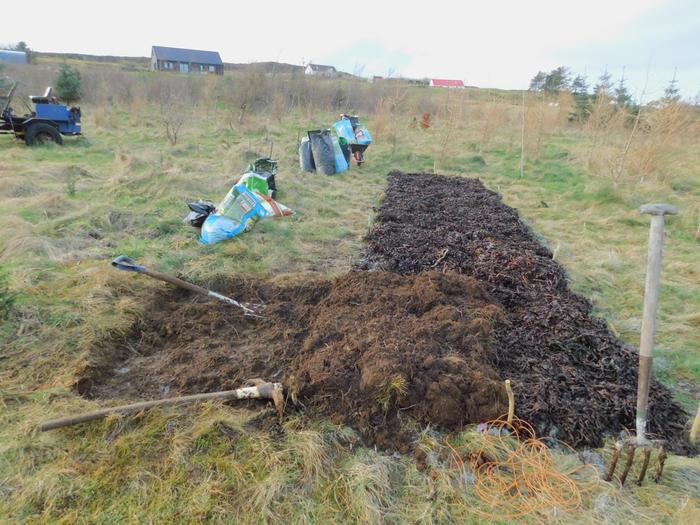
I then emptied the first lot of seaweed bags and spread the seaweed out. This is mainly kelp, which will rot down quite quickly, topped up with bladderwrack which tends to break down more slowly.The depression where the turf comes from will keep the lazy bed drained. I dithered a bit over whether I should make the beds N-S or across the slope, and I still don’t know whether there is a best way. In the end I went for perpendicular to the wind, which is just off up-down slope and not quite N-S in orientation. Wind is my biggest problem, and I’m more worried that orienting with the slope or sun will make a bit of a wind tunnel, than lack or excess of water.
Topping up seaweed – under puppy supervision
After spreading the seaweed, I had a go at lifting and inverting some of the turf. Ideally you want to fold the whole turf over like a carpet so as to have no holes for the grass to continue growing through. In practise I had to do this a different way. I used a spade and a mattock to try lifting a couple of strips of turf, but this is a) too heavy and b) too sticky for me to manage in a reasonable way. I think I made my bed far too wide for this technique to be practical – it is about 5 ft across.
Turning first turfs on lazy bed
I called it a day after turning three strips – one wide and two narrower. I had meant to turn over both sides like this, and then dig out the soil either side to cover it all thickly. What I did instead was cut small deep turfs (two spades by one spade probably) and cut a full spade depth of soil with each, and built the bed up by inverting these as close together as I could. I managed to fold over strips two spadewidths by two spadewidths at either edge of the bed. and infilled in between with turfs. I may get more grass regrowth this way, but I don’t think in practice it will make much difference and will save going back over doing most of the second lot of digging. Inverting the clods separately rather than trying to peel them over like a carpet definitely made the job a whole lot easier. It also exposed quite how compacted the soil is. Despite all the misty weather – a fine mizzle of low cloud that has meant the surface is quite claggy, especially where I walk often – handling the turfs has been relatively clean. The soil an inch or so down is actually – not dry exactly – but certainly not as wet as it deserves to be. The rain is not penetrating nearly as well as it should.
This leaves me with a muddy ditch either side for which I need to find a good surface for walking on. I’d prefer this to be a growing surface rather than an added material. I’m thinking something like white clover would be the obvious choice. Daisies would be good too, and self heal.
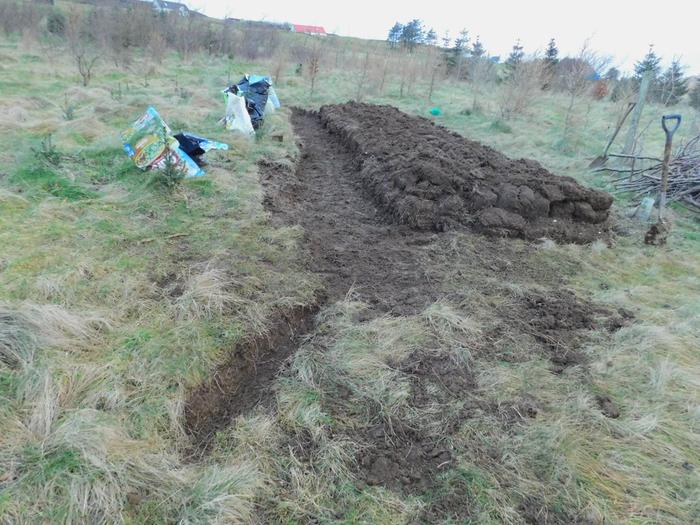
I’ve made a bit of a ramp down at the top end so that I can wheel my barrow down easily. I did the same at the bottom end too so as not to end up with a puddle or a step there, digging a little culvert to take any excess water into the bordering trees. I then skimmed the uneven soil off the paths, putting the loose soil onto the top of the bed to fill in the gaps in between the upturned turfs a bit. One of my access paths goes accross below the bed, so I had to take a bit more turf off this to get the levels more even.
Finished turf covering and drainage/ramps
I’m finding the soil generally satisfactorily deep. At the very top end was I hitting rock at about a spade’s depth, so since I am almost doubling the depth by putting turfs on top of the grass surface I should have a reasonable depth of soil to grow in. The soil at the bottom end of the bed is also shallow; the rock surface must be a bit uneven. I was finding bits of bedrock sticking up in the path a bit.
It wouldn’t be true to say the soil is completely lifeless. I don’t know about microscopic life, but there were a few pale earthworms, what I think may be clickbeetle larvae, and some weevil larvae. Not exactly teeming with life though. It is amazingly homogeneous in texture, just a fine silky silt brick, topped with grass and with pignuts throughout.
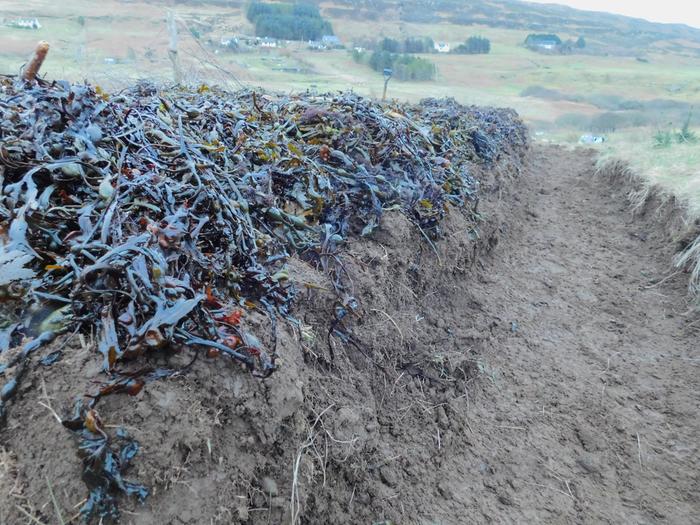
Having evened off both sides, I then I topped the entire bed with seaweed. This will protect the soil a bit from the rain and further feed the soil organisms. I didn’t bother level the earth on the top of the bed, just tried to fill in the bigger cracks. I’m pretty sure the weather will soon break it up enough, and hopefully the larger pores will keep it aerated. I needed more seaweed than I had initially thought to give a good layer.
finished seaweed mulched not so lazy bed
I think my main challenge in the rest of the planting areas will be the very compacted nature of the soil. There are no air pores in it at all. Hopefully the daikon radish will make some good holes to start off. I’ve also sprinkled some parsley seeds in already, but am not confident they will compete with the grass very well. I’d like to be in a position to start broadscale growing in 2023, but if the daikon don’t take well I may have to try some other biennials like hogweed which grows elsewhere in the field, but not on this bit yet. The alternative is more not-very-lazy-beds!
Much of this blog post appeared in slightly different form and more pictures on the Permies web forum here
Sometimes I just get a bee in my bonnet or a brain worm, and it niggles at me until I`ve worked out a solution. When I read `The One Straw Revolution` by Masanobu Fukuoka it opened up a whole new way of thinking for me. The concept that humankind cannot understand nature and that we should therefore immerse ourselves back and let nature take the driving seat is beyond what I was trying to do with my perennial vegetables and `edimental` food forest. My gardening has shifted away from annuals, but I now feel I can go back to growing them in a freer style. This thread, https://permies.com/t/163437/RED-gardens-simple-garden, on simple gardens was another part of the jigsaw for me, giving the concept of a simple succession or crop rotation if you will.
Neither what Fukuoka did with a two season grain system, or what Bruce Darrell did with a successional monocrop is quite what I want to do. Neither would work here, and I`d like to avoid the plastic sheeting too. I also want to create landraces for Skye of each of the crops I grow. This is another concept that is obvious once you take off the blinkers of modern agriculture. Diversity is the tool that will overcome changing times ahead.
There are two main problems I need to overcome: being able to cover the soil adequately in winter, either with standing crops or mulch, and initial clearing of a large area of grass.
Tackling the second issue first. I am hoping that direct sowing of grazing rye, Secale cereal, into short cut turf as soon as possible (end of September) will give it enough time to get roots going overwinter and then provide enough competition during the summer to crowd out some of the perennial grasses. If this doesn’t look successful by late spring, I’ll have to try mulching out the area with plastic and/or cardboard.
I had thought of trying to rent a field locally, but really that would be a bit over ambitious, so I`m going to use the area of the treefield which had mainly ash trees, now cut right back, due to dieback. It`s a bit of an irregularly shaped area, but that won`t matter when working manually. It is well drained (which is one reason the trees haven`t thrived; the grass there is more suited to drier conditions) with a slight slope to the south east. The soil (compared to much of my land) is pretty deep, being more than 12 inches to bedrock in the main, although quite compacted and with stones that make digging slow. After growing to maturity the first summer, hopefully the rye will produce enough straw to mulch out most of the rest of the grass over the following winter.
So the basic idea is a simple rotation: grains → peas, beans and broccoli → roots → replant perennials including potatoes→ back to grains again. I`m going to encourage self seeding where possible and gradually develop landraces over time. I`m not wanting to spend too much on seeds to start off and hope to spend no more than £100 this year (much of that on the grazing rye). Some of this will be for sowing next year, I want to autumn sow, or allow self seeding where possible, as being less work than spring sowing, although more seeds will be required to allow for losses over winter.
My first step was to start ordering seeds. I`m going to try and get two new varieties of each of the crops I want to grow and combine them with whatever other seeds I can obtain in the meantime. I have a few different varieties of peas for example, saved up over the years.
My next step is already taken. In this part of the treefield the trees have not been very successful. As well as the ash, there are a few small rowans, and some relatively young spruce and pine that I planted to create an intermediate shelter belt. There are also some baby korean pines and a couple of monkey puzzle seedlings, but in the main the area is quite exposed. I am going to try to make a quick growing shelterbelt from my perennial kale. Many of the side branches have broken off in the wind this week, and I have cut them to shorter lengths, so getting two or three cuttings per bramch. These I have inserted just downwind of the embryo shelterbelt. I don`t suppose the kale will inhibit the conifer`s growth, and by the time the conifers are big enough to shade out the kale, they will be creating shelter of their own.
It’s not that I’ve been doing nothing the last six months, it’s rather that I’ve been doing too much! Not just on the holding however, and not just plant related. Things are changing – priorities, the way plants change the landsape, family and work commitments all change the way I interact on this platform. It looks today like WP have made some more changes to the editing software that may make it a bit easier for me to edit and post at least on the PC, so I’ll give it another go and see how I get on this time. Unfortunately they also seem to have changed the scaling, I gues to suit mobile phone screens, but it leaves a lot of blank space on larger screens.
Elaeagnus branch with growth
It looks like it is going to be another really good growing year for the trees, and I didn’t lose as many plants as I thought over the winter. I thought I’d lost one of my Elaeagnus in the former Dog Resistant Garden, (FDRG) but I noticed this week that one branch is showing quite a bit of growth and is in flower. The unknown citrus in the polytunnel likewise is shooting up from the base. However the kiwi is a goner, as is my larger gevuina shrub and one of the seedlings. I still have one Gevuina seedling that looks pretty happy in it’s pot, so I need to find a slightly more sheltered spot to plant it out. I’ll have to source some more seeds, since it doesn’t look like any more of the seeds are going to germinate now. I still have a few in pots, but I am not hopeful that they are still viable. The Arbutus unedo looks a bit tatty, but still seems to be alive.
Tatty Arbutus unedo
I’ve done a bit of work on the front garden behind the FDRG – trying to get out the creeping grass and plant it up. There are a few currant bushes that are doing OK, some local elder cuttings ditto. I’ve also planted out the miscanthus grass seedlings and various other things that will do better in the ground that stuck in their pots. I was lucky enough to be given some dwarf jerusalem artichoke, and some chinese artichoke, so have planted these where the grass is more likely to come back – the theory is that If I have to dig to harvest then I can dig out the grass at the same time. I could probably do with doing some more mulching in this area too. We’ve had quite a warm summer, and so far the Yacon here seem to be doing better than in previous years.
Yacon and lush growth by FDRG
In terms of new planting, I haven’t done any broadscale tree planting this year. I had intended to replant the area that I had cleared the ash from with small leaved lime, beech, italian alder, local hazel and rowan, however I didn’t really have time for much this spring due to commitments in the shop. The experimental plantings of lime, and italian alder have done very well, however the sea buckthorn has struggled. Some of the bushes are still alive, but I wouldn’t describe it as much of a pioneer. It may be that it really dislikes my acid soil, or it might be that they take longer to get established and will romp away in a year or two. All I know is I’m not about to go out and splash out on expensive cultivars if they’re not likely to make it through. I bought four hazel cultivars this year and have been disappointed that two of them seem to have died. I probably will replace them next year though, since I do think that they have a good possiblity of good yield here. Next year I am also thinking of getting some Walnuts, and maybe some japanese heartnuts.
Baby Monkey Puzzle with bottle protector
I managed to germinate quite a few monkey puzzle tree seeds over the winter, and have started planting the seedlings into the treefield. Ideally I would leave them to get a bit bigger, but I have a poor record of keeping things alive in pots, so I think they will do better in the ground. I have marked various places around the tree field where I think the monkey puzzles could go with long sticks, and started turning the turf over to prepare planting holes. Unfortunately the spade handle finally splintered during this process, so there are still quite a few places to be prepared, and about half the seedlings still in pots. The trees in the fruit jungle really look impressive now. I have learnt from them not to plant the monkey puzzles too close to pathways since the leaf spines are really sharp!
Rather later than anticipated I’m reviewing my unusual tuber harvest for last year. I’ve had a few distraction in my life recently, mostly in my shop – creating a “zero waste” facility in a very short timescale thanks to a Zero Waste Scotland grant, but also getting sucked into the Permies.com forums. I guess the change in the WordPress editor hasn’t helped – I find it much slower to create a post now than it used to.
I actually dug the Yacon in the polytunnel on 22 January, and a few days later outside. By the start of February we had a prolonged spell of freezing weather and the temperatures got down to about -8 degrees Celsius. This is unusually cold for here and I have lost several other plants to the cold. Annoyingly this included some newly purchased ones that I had left outside the polytunnel without thinking that they would have been better off inside. It can’t have been that cold in the polytunnel, since the pond remained frost free. This at the same time as the river was frozen.
Yacon flowers 2020
The Yacon all seemed to grow pretty well last year. All were at least at tall as me, although not heading for the sky outside. Several had mulitple stems and all the new ones developed some lovely flowers like tiny sunflowers. The different varieties flowered at different times, so it is unlikely I will get viable seeds, see Cultivariable . I had the following harvest of tubers:
Yaon New Zealand 2020
New Zealand:
Plant1: 1500g
Plant2: 3775g
Plant3: 1750g
Yacon Morado 2020
Morado:
Plant1: 1875g
Plant2: 350g (this one got stem rot early in the summer and the upper growth remained poor)
Plant3: 1750g
Plant4: 2600g (this one only one with broken tubers)
White std: I seem to have mislaid my harvest information, but I remember it was a bit less than the other two.
Yacon after peeling, (L-R Original, NZ, Morado)
All the NZ plants had some broken tubers with splits. The original white plants seemed to vary quite a a lot in yeild and tuber quality. The Morado tubers have the darkest colour skin, and the flesh is also slightly orange in colour. The New Zealand is more uneven in colour and the tubers are white under the skin. I found that the flavour of the original ones were the sweetest, and the tuber sizes on the Morado and New Zealand were larger, as was the yield. The plants outside did much less well, none of them had tubers of any great size, none bigger than a fat finger perhaps.
Some of the tubers did not store too well. I think that they were rather damp and cold when they came in and they got some mould developing on the skins. Surprisingly though I still have a few that appear perfect. The last one I tried though had a slight off taste, so I think I wil compost the rest.
I have also harvested the mashua from the polytunnel. This seems to have been quite happy last year despite not having had any attention, and I got a fair amount of tubers from the plants. It didn’t flower at all though. I left some nice tubers adjacent to the polytunnel side in situ to regrow this year and they survived the cold snap and are growing away nicely. I made some chutney with most of the tubers, the spicy flavour goes well in my standard chutney recipe, although I think next time I will reduce the cinnamon and cloves.
So much for the good – now for the bad.
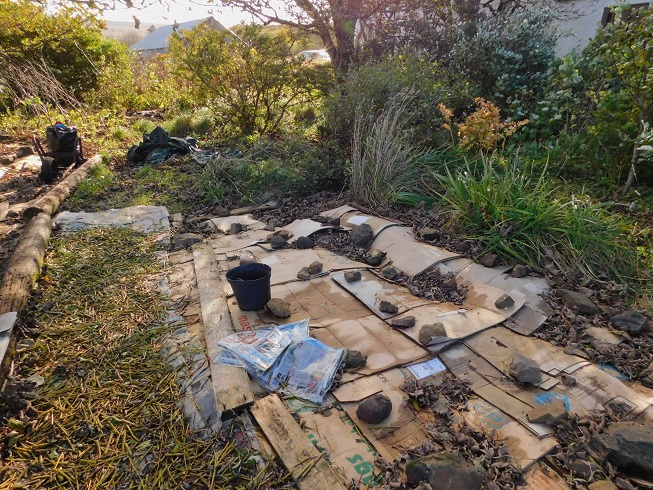
I did not harvest the oca before the hard frosts…..
Digging frosted tubers
I had carefully planted out my different coloured oca harvested from last year in the pallet garden, so that I could grow out and compare the different tubers for taste and yeild. They grew away pretty well and flowered last year. Unfortunately almost all the tubers got frosted. They develop just under the surface (in fact some were on top of the ground surface and were eaten by birds, mice or slugs….) and were not deep enough to escape damage. All the tubers were pale and soft. Only a very few tubers that were closest to the pallet seem to have escaped the frost. I didn’t have results therefore for yield or flavour comparison, I had just a few tubers to plant this year and only one seems to be sprouting in its pot. However, I have several offers of new tubers for next year so will start again. Maybe the one survivor is more frost tolerant, time might tell…
This has been the coldest spell we’ve had in several years. Freezing temperatures both night and day, for several weeks. The sky’s have been clear; Blue cloudless days and stunning starry nights. I’m hoping that I haven’t lost many plants, I think the minimum we reached was about -8 degrees Celsius. Everything looks really dessicated, although it’s not been windy, everything is freeze dried. Despite the time of year there have been several wild fires on Skye and the outer isles, leading to road closures in the middle of Skye last week. I don’t know whether they were deliberate (muirburn to regenerate grazing) or accidental fires.
My wasabi has died back, and the luma apiculata’s leaves have dried up. I forgot to wrap the unknown citrus in the polytunnel and that has shrivelled leaves too. Hopefully these will all sprout back in spring, I do hope so. There was a little snow but most of it melted before it froze again. There is snow on the tops of the hills still, which look like Mt. Fuji.
Ice crystals in grass
As the ground is frozen, I can’t really get on with planting anything, but I’ve made some progress with coppicing. I’ve cleared a little of the alder copse at the top by the cut through. I cut those between the windbreak and the cut through, so the regrowth should have a bit of shelter.
Alder coppice at cut through
Some of the birch are getting pretty big now. I have taken out some of the lower branches; singling the stems so they will make straighter logs in time perhaps.
Singling birch
Further down again I singled out more alder along the top of the river bank and in the pond area, also taking out completely one multistemmed tree. I think that’s all I’ll do for this year. I don’t want to overdo things, especially until I know how well the regrowth will do. We won’t have enough to be self sufficient in wood I don’t think, however it’s nice to feel like we’re making a step in that direction, especially with it having been so cold recently.
Unfortunately this year I am hoping some of the wood I am cutting will not grow back, unlike most of my coppicing. I have decided that the dieback I am getting on the ash trees is actually Chalera, and have reported it to to the treealert forestry research site.
Up until last year I had not noticed green leaves dying back, and the dieback was not generally associated with nodes. I suspect that these specific parts of the symptoms are associated with more mature trees, rather than young saplings. None of my trees is taller than about 8 feet or more than 6cm in diameter. Previously I was just noticing dieback of new shoots, I noticed some symptoms as far back as 2012. But many of my young trees die back as a result of salt winds in winter on new growth, Hazel and Oak for example, so I wasn’t sure whether to be too concerned.
View of central Ash area
Last summer I noticed several trees where some new green growth had wilted, just fading away rather than turning colour like they do in autumn. In addition, I could see some marking spreading from the branch nodes like the pictures show on the ash dieback pictures. I have not really seen this before.
Dieback of Green leaves
Dieback at branch node
I don’t know whether the symptoms I have seen before were ash dieback, or whether it has just arrived this year. Anyway, rather than just interplanting the ash with different trees as discussed before, I decided to try and remove the ash completely. I have therefore cut the trunks right down as near to the round as possible. This involved lifting up the vole guard, removing the grass to expose the trunk and cutting as close to the earth as possible. The picture below shows the bottle vole guards catching the light showing the tree I’ve cleared around.
Clearing the grass from the trunks.
I am hoping that by leaving off the vole guards, that the little critters will eat any regrowth from the ash, although I suspect they may grow back a bit since some have been in more than 10 years now. Hopefully I will not need to dig out the roots as well.
Victims of Chalera
Although the trunks are generally quite small (and many diseased), there are a few that may be big enough to be useful as tool handles. I need a new rake handle as my best one was broken over the winter. The rest of the ash will only be useful as kindling, but I think it best to burn it as soon as possible, rather than leave it to compost as I would otherwise do.
I’ve still got just a few ash to take out: one or two that I’ve spotted which I missed the first time round, and a dozen or so right at the top, that were local provenance, but also don’t look good. We’ve had a bit of snow this week, so I’ll wait till that thaws before finishing off.
Bamboo marks positions for two of the new hazels.
On a more positive note, I potted up another ten monkey puzzle seeds at the weekend. Also my plants from ART have come. I have decided where to plant my four hazelnut trees, and there are three blueberry bushes to plant too. Also my Xmas present from my super younger sisters has come, at least the plants I bought with the Edulis nursery voucher have. I therefore have plenty to do outside once the weather allows.
I’ve been a bit busy with shop projects recently, and with the daylight being so short at the moment, I haven’t actually done very much outside. It is just past the solstice and it is dark till 8 a.m. and dark again at about 4.30 p.m. The days are supposedly getting longer. Usually by the start of February the difference is appreciable. Some plants are already starting to show spring growth; the celandine leaves are already forming, others don’t seem to have realised yet that it is winter! Some of the fuchsias still have most of their leaves. Although the winter hasn’t been too bad yet, this week is set to be colder and drier, so at once will be frostier, but nicer for working outside.
In the former DRG I have staked the Gevuina, which is starting to rock in the wind a bit. I’ll prune the leader out this summer coming and see if I can start a new plant from the removed tip; it is supposed to be fairly easy to take cuttings. The two seedlings that grew this summer are still doing well. I have just left them outside in the wet and they seem to be thriving. I wonder if they prefer the cooler damp conditions, rather the drier, warmer conditions I tried in the polytunnel with previous seeds. Maybe a little warmer to germinate, then outside to the wet again? I still have several pots with seeds in that have not started to germinate but look healthy.
Large female Monkey Puzzle Tree in Portree Skye (May 2019)
I am rather keen to grow many more monkey puzzle trees. They grow so nicely and shrug off the winds here. The plan would be to put them all down the hill (not near paths) and let them grow until they fruit. Then the female trees can be kept to provide nuts, and the male trees harvested for timber. To this end I bought a moderate amount of Scottish harvested seeds from an ebay seller, and have put these to germinate in the kitchen. Based on the instructions provided by the seller, I soaked the seeds overnight, placed a layer of damp vermiculite in a couple of old strawberry punnets, pushed the seeds in about half way, put the lids back on the trays and put the trays stacked on top of each other near the stove flue.
Seeds by Stove Flue
Every few days I sprayed the tops of the seeds with water to keep them damp. After a couple of weeks I taped up most of the ventilation holes in the lids, since the seeds seemed to be getting a little dry in between sprays. As I noticed that there were a few roots developing the other day I tipped the seeds out and sorted them.
Sorting sprouting seeds
About one third were sprouting so I potted them into small pots. They are still in the kitchen at present to keep them warm, I’ll transfer the pots to the study windowsill in a week or so, when they seem to be settled down, and keep spraying them till then. There were a few seeds that had rotted, so these were removed and the rest put back in the vermiculite, to carry on germinating. It may be a few months before all those that will have started sprouting.
Planted up sprouting seeds
The tomato and shark’s fin melon seem to be doing well on the window sill, however the tamarind has died. I think it was too cold for it on the window sill. I moved it through to the kitchen, but I’m pretty sure it is too late.
The evenings are really starting to draw in now and we’ve already experienced our first frosts. This is a little early for Skye. It doesn’t seem to have damaged the plants in the polytunnel yet though. I have brought in the Tamarind seedling that my neighbour gave me, and have also potted on and brought in two pepper plants and two sweet peppers. The vines on the pumpkin nuts have died back, so I have brought those three fruit in to keep safe. The shark’s fin melon vine still looks healthy and I have cut it back and dug it up, so that I can try and overwinter it indoors, since the plants are perennial in milder climates. Last week I removed all the rest of the tomato fruit and made a chutney. It burnt on the pan a bit, but tastes alright. I still need to remove the remains of the plants yet.
Single Sharks fin melon before potting up
I mulched the DRG side of the new front garden area I have been working on with cardboard, and dug up, divided and replanted one of the daylillies from the original DRG. This one has quite large orange flowers. Daylillies are another of the ‘edimental’ plants I have been growing. The flowers, known as ‘golden needles’ are esteemed in parts of China and dried to be eaten as a vegetable. I think the leaves and roots are also edible, although have not tried them at all yet. Slugs certainly like the leaves, so I have protected the newly planted divisions with a cut off plant pot collar. I’m a bit disappointed that the grass is growing back quite a bit in the new area by the DRG. I obviously did not clear as much as I had thought. Since I have seeded as well as replanted this area it is a bit difficult to know what to do for the best. I guess I will have to try and spot mulch the worst patches….
As the autumn progresses the leaves are falling audibly off the sycamores in the front garden. I hadn’t realised how well the swales I had made would trap the leaves. This will hopefully enable an auto-mulching of the plants in the dips. I’ll have to reconsider what I planted there, with a view to maximising this benefit. Certainly the asparagus will appreciate an annual mulch, so I’m extra glad now I planted them in the dips rather than on the humps, but maybe there are other herbacious perennials that would benefit similarly. It will be interesting to see whether the leaves are still there after a winter gale or three….It was pretty windy last week and the leaves still seem to be staying put.
Catching leaves
Rather than leave it till all the leaves had fallen from the willow fedges, I decided to prune and tidy them earlier. This will reduce the vigour of the willow slightly and make the fedges less likely to get damaged in winter winds by providing less of a catchment for the wind. I painstakingly cut the willow into short lengths to put on top of a newspaper mulch along my new pathway around the former DRG. I first tied the willow into bundles to make it easier to handle, but it was still pretty tedious. I could have used the shredder, but my memory of shredding willow last time was that was pretty tedious as well, and rather noisy.
Mulching DRG path with willow and cardboard
Anyhow I had a good win this week! There is a band of ‘tree surgeons’ going round the area at the moment who are cutting back trees which are too close to powerlines. I noticed them shredding the prunings onto their little tipper van and asked them if they wanted to dispose of them locally and they did! So I now have a pretty big pile of ready shredded spruce branches to use as mulch material on paths, and possibly in my blueberry patch when I get round to planting that up.
If you don’t ask you don’t get
Finally a new caterpillar sighting for us. We usually joke that Dyson is a crap guard dog, and he replies that he keeps away the elephants for us. Here is one he missed:


You must be logged in to post a comment.